Our June 2023 release includes a new feature: the project planning area. In the planning area, you can take action items from the action item catcher and use those captured ideas and to-dos to create a project plan.
Any project plans you create in the planning area can be scheduled into each of the planner views (Daily, Weekly, Monthly, Quarterly and Yearly.)
How the planning area works
When you open the planning area using the “outline” icon from the top menu,

you’ll see two columns.
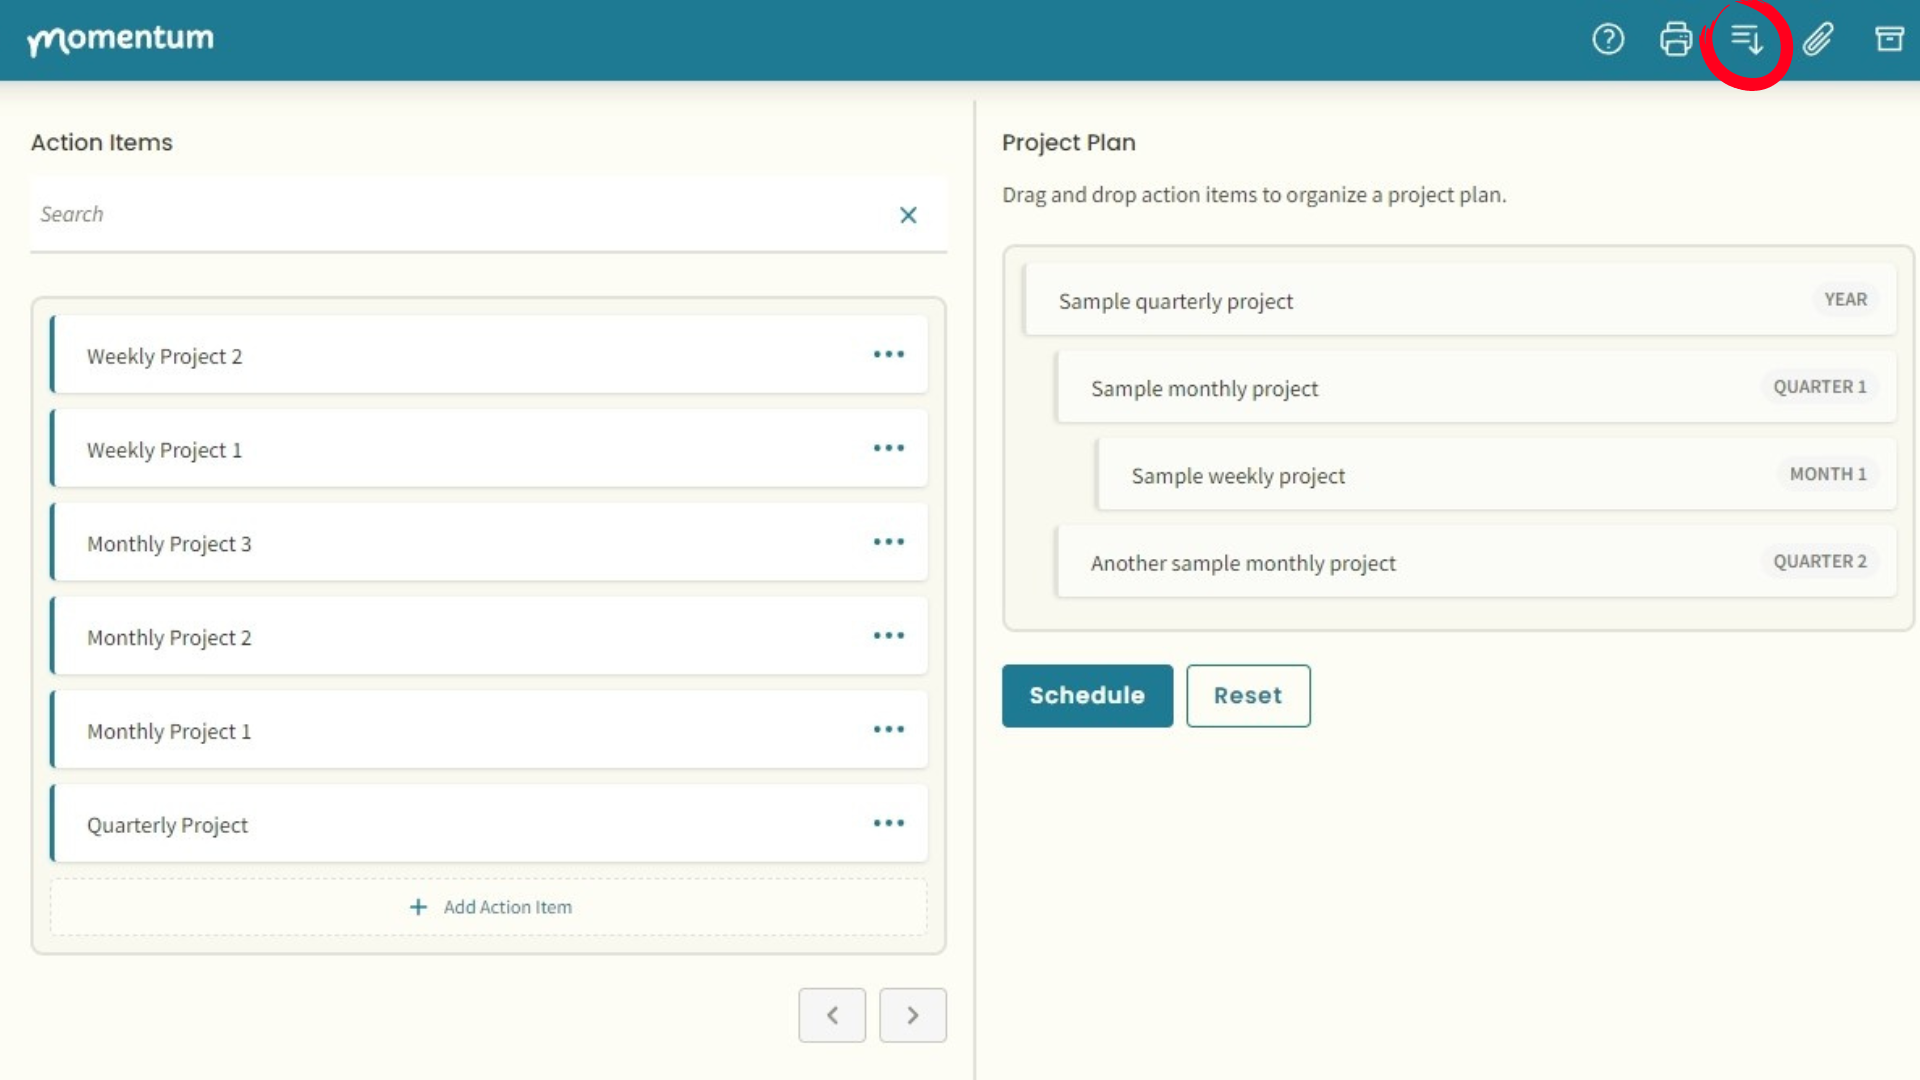
The left column above ☝️ is your action item list. You can add action items here, or if you’ve already been using the action item catcher, you’ll see this area already populated with the ideas and to-dos you’ve captured there.
(To access the action item catcher, use the paperclip icon 📎 on the top menu.)
Once you have action items captured and are ready to start planning, start dragging action items over from the left side to the project plan on the right. Once you drag your first action item over, the placeholders will disappear.
To indent/nest an item: drag the action item over to the planning side, overlapping just a bit the item you want to nest it under. Continue to drag the action item to the right until you see the indent below the other item, and release.

You can also “outdent” items by holding and dragging them to the left in the planning area.
Planning horizon tags
Your action items will inherit a planning horizon tag (Year, Quarter, Month 1, Week 1) when you drag them over to the planning area.

To change the tag, simply click on it to cycle through the various options until you reach the time horizon you want.
Note that the horizon tags available for those action items are dependent upon the position of the item in the planning area. Example: if you start with a Quarterly plan item at the top, and drag over an item to the monthly position beneath it, only the Month tags (Month 1, Month 2, Month 3) are available for those sub items.
The lowest possible level of a plan is the project chunk; it does not have a horizon tag.
You can have more than one action item of a particular time horizon; e.g., you can have multiple Month 1 tags in your plan, representing several monthly projects you’ll complete during that first month of the quarter.
Note: the planning area can only have one parent, top-level item representing the single overarching project you are planning; all other action items should fall beneath this one, in lower time horizons (i.e. multiple monthly action items under one quarterly plan.) If you include multiple highest-level time horizon “parent” projects, Momentum won’t be able to schedule your project plan. You will only be able to schedule once you fix the issue, to make sure there is only one highest level project (to which all the other subproject action items belong).
When you change the horizon tag of your top-level project, it will automatically adjust the sub-projects’ levels to match (quarters become months, months become weeks, etc.).
The horizon tags are very important to the structure of your plan.The tags tell Momentum where to schedule the individual project components in your planner views when you complete your planning and click SCHEDULE to move everything over.
Note: the planning area and schedule function replace the “convert” steps in the action item catcher in this situation. You can still use the convert function from the action item catcher panel to assign an item type and schedule it in your planner if you wish, without using the planning area (this is useful for individual tasks you want to schedule).
Scheduling your plan on your planner views
Once you complete your planning and have the project plan where you want it, click SCHEDULE. This will push everything in the planning area (but not any of your items still in the action item catcher) to the planner views that correspond with how you organized your plan.
When you click SCHEDULE, you’ll see options based on the highest level of project you selected in your plan (year, quarter, month).
Once you’ve made that selection and clicked SCHEDULE PROJECT, Momentum will automatically place the project and its sub-projects in the appropriate planner view, based on the following rules:
- Yearly, quarterly, monthly, and weekly projects will appear on the corresponding planner view. Within any of those planner views, you can edit or update those projects in the future (update the description, assign a color, etc.).
- Project chunks (the lowest item level when creating a project) will all appear on the first day of the corresponding week, and can be moved to particular days during your weekly planning.
Note that once you’ve created and scheduled a project:
- Those items associated with that project will disappear from the planning area and the action item catcher, since they’re now scheduled in your planner.
- Scheduling a project can’t be undone, so be sure you have it the way you want it before you move the project from the planning area to your planner.
- If you want to make any changes to the structure of that project once it’s scheduled, you’ll have to make those changes in the appropriate planner views.
Tips for using the planning area
If you are a top-down planner, the planning area process should be fairly intuitive.
- Start with your highest-level project and drag it over.
- Select its time horizon.
- Drag and drop action items to nest your sub-projects beneath it, in the configuration that works best for you.
- Drag action items into any structure and order you like.
- In the action items area, create any additional action items you need and drag them over. (You’ll likely be chunking down larger projects into smaller ones.)
- When you are satisfied with the project, click SCHEDULE to send it to your planner.
If you are a bottom-up or middle-in planner, your process will be a little different, since you’re stitching together smaller projects/chunks/tasks into their larger components.
- Start by creating a placeholder for your highest-level project. We recommend either a quarter-sized or month-sized project for this to start, since many of your action items will be smaller (project chunks and tasks).
- Drag and drop the projects/chunks/tasks you think go together as a project.
- Look for connections between these individual tasks and chunks and link them together to craft the next-bigger-horizon project (several chunks to a weekly project, several weekly projects to a monthly project, and so on).
- You may need to create these new higher-horizon projects in the action item side first, and then drag them over to the planning area.
- Drag action items into any structure and order you like.
- In the action items area, create any additional action items you need and drag them over.
- When you are satisfied with the project, click SCHEDULE to send it to your planner.
If you need additional support on how to apply Momentum Planning principles in Momentum, check out the following knowledge base articles: